- 1 Escher's Printmaking Techniques
- 2 Discovering the Art of Linocut
- 3 The Best Tools for Lino Printing
- 4 Additional Lino Printing Tools
- 5 Step-by-Step Guide to Lino Printing
- 6 Lino Print Examples and Inspiration
- 7 Troubleshooting and Tips
- From Concept to Creation: Celebrating Your Progress
- Quick Facts and FAQ
Have you ever wondered how M.C. Escher created his fascinating prints? His clever use of perspective and detail has captivated countless art enthusiasts.
Escher was a master printmaker who created amazing pieces out of ordinary materials. His careful techniques and precise tools were key to his success. But here’s a little secret: you don’t need to be a genius to try your hand at this. You just need the right supplies. That’s where a quality lino print kit comes in.
Good tools can make all the difference. They help you achieve clean lines and detailed textures so that you can capture the essence of Escher’s style. If you’re ready to dive into the world of printmaking and add a bit of Escher flair to your work, get yourself a quality linoleum print kit.
Roll up your sleeves and let’s discover how the right tools can help you create stunning prints inspired by Escher’s genius.

1 Escher’s Printmaking Techniques
M.C. Escher’s printmaking turned imaginative visions into captivating works of art. When you explore these techniques, you’ll see the depth of his craft and the dedication behind each piece.
Printmaking is a fascinating and labor-intensive process that lets artists create multiple copies of a single image. This technique has shaped art history, allowing artists to share and replicate detailed designs. Here’s a closer look at the different methods M.C. Escher used to create his stunning works:
- Woodcut (Wood Block)
- Escher started with an idea, which he then transformed into a detailed drawingDrawing is a foundational art form that involves creating images on a surface, typically paper, using tools such as pencils, pens, and charcoal. It is a versatile medium that allows artists to express ideas, emotions, and stories through lines, shapes, and shading. Historical Background • Prehistoric Beginnings: The earliest known drawings date back to prehistoric times, with cave drawings found More.
- Using tracing paper, he transferred a mirror image of the final sketch onto a smooth woodblock.
- He carefiully carved away the areas that he did not want to print, leaving the raised portions to be inked.
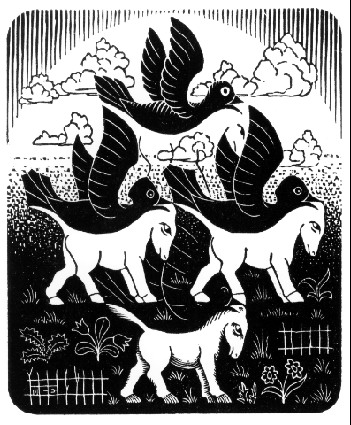
- For multi-colored prints, Escher used a separate block for each color, requiring precise alignment to ensure the colors fit together perfectly.
- Example: “Horses and Birds” woodblock, where a large hole was drilled to prevent posthumous printings, and talcum powder was applied to highlight the cut grooves.

- Linocut (Linoleum Block)
- Similar to woodcut but using linoleum, which is softer and easier to carve, making it a popular choice for modern artists.
- The process involves transferring a design onto the linoleum block, carving out the negative space, inking the block, and pressing it onto paper.
- Linocut allows for fine details and is versatile, making it accessible for those looking to emulate Escher’s style.

- Mezzotint (Copper Plate)
- Mezzotint involves etching an image into a smooth copper plate, a technique known for its rich, deep blacks and subtle gradations of tone.

- Escher created eight mezzotints in his career, with “Eye” being one of his most famous works.
- The process is complex and requires careful planning and execution to achieve the desired results.

- Lithograph (Stone Block)
- Lithography involves drawingDrawing is a foundational art form that involves creating images on a surface, typically paper, using tools such as pencils, pens, and charcoal. It is a versatile medium that allows artists to express ideas, emotions, and stories through lines, shapes, and shading. Historical Background • Prehistoric Beginnings: The earliest known drawings date back to prehistoric times, with cave drawings found More an image directly onto a stone block with a greasy substance.
- The stone is then treated so that the drawn areas attract inkInk, a liquid or paste used for writing, drawing, and printing, has played a crucial role in communication and artistic expression throughout history. Made from various pigments and dyes, ink allows for the transfer of text and images onto surfaces such as paper, fabric, and other materials. Types of Ink There are several types of ink, each serving different purposes More while the rest repels it.
- Escher’s lithographs were printed by professionals, but the original drawingDrawing is a foundational art form that involves creating images on a surface, typically paper, using tools such as pencils, pens, and charcoal. It is a versatile medium that allows artists to express ideas, emotions, and stories through lines, shapes, and shading. Historical Background • Prehistoric Beginnings: The earliest known drawings date back to prehistoric times, with cave drawings found More and concept were his.

- This technique allowed for high precision and was used for some of his most famous works, including “DrawingDrawing is a foundational art form that involves creating images on a surface, typically paper, using tools such as pencils, pens, and charcoal. It is a versatile medium that allows artists to express ideas, emotions, and stories through lines, shapes, and shading. Historical Background • Prehistoric Beginnings: The earliest known drawings date back to prehistoric times, with cave drawings found More Hands.”

Printmaking was a challenging process for Escher. He often made over 70 drafts for a single piece to make sure every detail was just right before starting the final print. His prints were usually made in limited editions. He tagged many of them with the words “eigen druk,” which translates to “by my own hand.” This personal touch added to the valueIn color theory, value refers to the lightness or darkness of a color. This concept is crucial for artists and designers because it helps create depth, contrast, and visual interest in their work. Value is one of the three properties of color, alongside hue and saturation. Defining Value Value indicates how light or dark a color appears. It ranges from More and uniqueness of his work.
Escher created 448 masterworks during his lifetime, all of which were printed from his own blocks. He never employed an apprentice, guaranteeing the authenticity and excellence of every print. Escher was very protective of his creations and rarely issued posters or reprints. His prints are highly prized by collectors today due to their scarcity.

2 Discovering the Art of Linocut
Although Escher used a range of printmaking techniques, linocut is the one that contemporary artists can most easily access. For linocut, a softer, more manageable material is used instead of wood, copper or stone. This makes it perfect for both beginners and experienced artists.
Escher used linocut to create some of his most famous works. The technique’s versatility allowed him to experiment with different textures and patterns. For example, his print “Fish and Scales” showcases the detailed and repetitive patterns that linocut can produce.

Advantages of linocut:
- Ease of Use: Linoleum’s softness allows for smoother cuts and more detailed designs. You can achieve detailed patterns with less effort. This ease of use encourages creativity and experimentation.
- Affordability: Linoleum blocks and carving tools are generally cheaper than materials needed for other printmaking techniques. This makes linocut a great option for artists on a budget, allowing you to explore printmaking without a big investment.
- Straightforward Process: Simply sketch your design, transfer it to the linoleum block, carve out the negative space, inkInk, a liquid or paste used for writing, drawing, and printing, has played a crucial role in communication and artistic expression throughout history. Made from various pigments and dyes, ink allows for the transfer of text and images onto surfaces such as paper, fabric, and other materials. Types of Ink There are several types of ink, each serving different purposes More the block and press it onto paper.
- Safety: The softer material reduces the risk of injury from carving tools, making it a safer option for artists of all ages. Always use sharp tools carefully and carve away from your body to avoid accidents.
Look for linocut kits that provide high-quality linoleum blocks, a range of carving tools, and inks. These kits often come with detailed instructions, making it easy to learn and perfect your technique. A good lino print kit will help you explore this fascinating technique and produce artwork you can be proud of.
3 The Best Tools for Lino Printing
Speedball Water-Based Block Printing Starter Set
The Speedball Water-Based Block Printing Starter Set is perfect for beginners looking to get into block printing. The set includes a soft 4″ × 6″ Speedy-Carve block for effortless carving, a comfortable linoleum cutter handle, and three cutters (#1, #2, and #5) for detailed work. The 4″ soft rubber brayer ensures even inkInk, a liquid or paste used for writing, drawing, and printing, has played a crucial role in communication and artistic expression throughout history. Made from various pigments and dyes, ink allows for the transfer of text and images onto surfaces such as paper, fabric, and other materials. Types of Ink There are several types of ink, each serving different purposes More distribution, resulting in clean prints.
When I started my lino adventures, I loved the user-friendly design and the clear instruction booklet that guided me through each step. The water-based inkInk, a liquid or paste used for writing, drawing, and printing, has played a crucial role in communication and artistic expression throughout history. Made from various pigments and dyes, ink allows for the transfer of text and images onto surfaces such as paper, fabric, and other materials. Types of Ink There are several types of ink, each serving different purposes More, included in the kit, makes cleanup simple and hassle-free. The kit is ideal for creating art for cards, prints, journals, and other paper crafts, making it a great choice for anyone starting in block printing.

Essdee Lino Cutting and Printing Kit
The Essdee Lino Cutting and Printing Kit is also a perfect beginner set. It comes at a slightly higher price than the Speedball starter option. Unlike the more basic Speedball Water-Based Block Printing Starter Set, the Essdee kit offers a wider variety of materials and tools. It includes two SoftCut carving blocks, two lino carving blocks, a practice piece, and MasterCut printing stamps, providing ample material to experiment with different textures and patterns.
The kit’s safety features, such as the safety lino cutter and hand guard, make it even easier and safer for beginners to carve their designs. Additionally, the inclusion of a premium 100ml block printing inkInk, a liquid or paste used for writing, drawing, and printing, has played a crucial role in communication and artistic expression throughout history. Made from various pigments and dyes, ink allows for the transfer of text and images onto surfaces such as paper, fabric, and other materials. Types of Ink There are several types of ink, each serving different purposes More, an inkInk, a liquid or paste used for writing, drawing, and printing, has played a crucial role in communication and artistic expression throughout history. Made from various pigments and dyes, ink allows for the transfer of text and images onto surfaces such as paper, fabric, and other materials. Types of Ink There are several types of ink, each serving different purposes More roller, an inkInk, a liquid or paste used for writing, drawing, and printing, has played a crucial role in communication and artistic expression throughout history. Made from various pigments and dyes, ink allows for the transfer of text and images onto surfaces such as paper, fabric, and other materials. Types of Ink There are several types of ink, each serving different purposes More tray, and a baren ensures you have everything you need for successful printing.

Speedball Deluxe Block Printing Kit
The Speedball Deluxe Block Printing Kit is perfect if you’re ready to take your block printing to the next level. After starting with the Speedball Water-Based Block Printing Starter Set, I chose this deluxe kit as my skills improved. It includes a 4″ x 5″ mounted linoleum block, a 4″ x 6″ Speedy-Carve block, and five linoleum cutters (#1, #2, #3, #5, and #6), offering more carving options than the starter set.
The kit also comes with black, red, blue, and yellow inks, plus an inkInk, a liquid or paste used for writing, drawing, and printing, has played a crucial role in communication and artistic expression throughout history. Made from various pigments and dyes, ink allows for the transfer of text and images onto surfaces such as paper, fabric, and other materials. Types of Ink There are several types of ink, each serving different purposes More extender for transparent colors, allowing for more vibrant prints. The dual-purpose bench hook/inking plate is a great addition for both securing the block and inking. These extra tools and materials have been invaluable for refining my technique and tackling more advanced projects. Therefore, I recommend it as an excellent choice for anyone looking to expand their block printing game.

Blick E-Z Cut Classroom Starter Kit
The Blick E-Z Cut Classroom Starter Kit is perfect for teachers planning a large printmaking project, like an Escher-inspired project. This kit has everything needed for a class up to to 30 students. It includes 24 printing blocks (4″ x 6″), 30 wooden handles, and six different cutters with six of each. The set also comes with two 2.5 oz tubes of black water-based inkInk, a liquid or paste used for writing, drawing, and printing, has played a crucial role in communication and artistic expression throughout history. Made from various pigments and dyes, ink allows for the transfer of text and images onto surfaces such as paper, fabric, and other materials. Types of Ink There are several types of ink, each serving different purposes More (ideal for cleaning up!), two 4″ hard rubber brayers, a pocket sharpening stone, 300 sheets of Masterprinter Paper, and 24 plastic spoons for burnishing.
The kit ensures that students have all the tools they need to explore and create their own block prints, making it an excellent choice for any larger project setting.

4 Additional Lino Printing Tools
E C Lyons Palm-Grip Carvers
The E C Lyons Palm-Grip Carvers are an excellent choice for upgrading your carving set. These tools feature forged, heat-treated steel blades and smoothly finished 4-3/4″ wooden handles, making them comfortable and precise. The 6-piece set includes a knife, chisel, gouge, shallow U gouge, veiner, and a sharpening stone, providing a great range for relief carving on wood or linoleum.
I found these carvers to be a big improvement when I had outgrown my first sets. The palm-grip handles fit perfectly in your hand, allowing for better control and finer details in your work. If you’re ready to take your carving to the next level, this set is a fantastic investment.

Essdee Linocut Safety Hand Guard
If you want another layer of safety while lino cutting, I recommend the Essdee Linocut Safety Hand Guard. This guard slots around the right-angled corner of your lino, protecting your restraining hand from sharp cutting blades as you hold your workpiece in place. Made from high carbon steel, it’s both durable and long-lasting.
One of the best features is its ambidextrous design, making it suitable for both left and right-handed users. In my experience, using this safety guard has significantly reduced the risk of accidents, allowing me to focus more on my carving without worrying about my fingers.

Richeson Bulk Printmaking Paper
The Richeson Bulk Printmaking Paper is the best choice for anyone needing high-quality printmaking paper in bulk. Available in a variety of sheet sizes and pack sizes, this paper offers excellent valueIn color theory, value refers to the lightness or darkness of a color. This concept is crucial for artists and designers because it helps create depth, contrast, and visual interest in their work. Value is one of the three properties of color, alongside hue and saturation. Defining Value Value indicates how light or dark a color appears. It ranges from More while providing the perfect surface for a wide range of techniques, including lino block printing, wood block printing, etching, sumi paintingPainting is a fundamental form of visual art that has been practiced for thousands of years. It involves applying pigment to a surface such as canvas, paper, or a wall. Painting can be explored through various styles, techniques, and mediums, each offering unique possibilities for expression and creativity. Historical Background • Ancient Beginnings: The history of painting dates back to More, monoprinting, bookbinding, stamping, watercolorsWatercolors are a unique and expressive medium, beloved for their translucency and fluidity. This type of paint is water-based, allowing artists to create delicate washes, vibrant hues, and details with ease. Historical Background • Ancient Origins: Watercolor painting dates back to ancient civilizations, including Egypt and China, where it was used for manuscript illumination and decorative arts. • Renaissance Revival: More, and mixed mediaMixed media involves combining various art materials and techniques within a single artwork. This approach allows artists to explore diverse textures, effects, and expressions. Basic Components of Mixed Media • Traditional Media: Includes paints, inks, and pencils. • Non-Traditional Media: Items like fabric, metal, and found objects. • Digital Elements: Incorporating digital prints or using software for certain effects. Techniques More. Its acid-free composition ensures longevity and durability, with both internal and external sizing to handle various inks and paints beautifully.
When working on large print projects, I found this paper to be the most reliable and versatile one, consistently delivering crisp and clean prints. I can highly recommend it to any artist or educator looking to stock up on quality printmaking paper, Richeson Bulk Printmaking Paper is a fantastic option.

Speedball Spinback
The Speedball Spinback has massively improved my printing process. Designed by master relief printmaker Alex Carmona, this tool solves the problem of keeping wood blocks stable while carving and allowing them to rotate when needed. Its ergonomic design removes the strain of holding the block down, making carving more comfortable. The Spinback’s sleek design features 79 holes and an adjustable lock to fit a variety of block sizes, and the top plate fully rotates, providing incredible flexibility. Using the Spinback has made my carving sessions smoother and more efficient, allowing me to focus on creating detailed prints without the hassle of constantly adjusting the block.

- Overview of other essential tools, such as carving tools, inks, and papers.
- Tips for choosing the best linoleum for block printing.
5 Step-by-Step Guide to Lino Printing
Preparing Your Design
Creating a linocut print starts with a strong design. Escher often made dozens of preparatory sketches to refine his ideas before committing them to the block. You don’t have to sketch 70 times like Escher, but taking time to plan your design will pay off in the end.
Begin by brainstorming your ideas and making rough sketches. Consider the elements you want to include and how they will interact on the page. Think about the balance, composition, and the areas of positive and negative space. Once you have a concept you’re happy with, create a detailed drawingDrawing is a foundational art form that involves creating images on a surface, typically paper, using tools such as pencils, pens, and charcoal. It is a versatile medium that allows artists to express ideas, emotions, and stories through lines, shapes, and shading. Historical Background • Prehistoric Beginnings: The earliest known drawings date back to prehistoric times, with cave drawings found More of your final design.

The next step is to create a mirror image of your design. This step ensures that the final print will appear as intended, especially if your design includes text or asymmetrical elements. Use tracing paper to transfer your drawingDrawing is a foundational art form that involves creating images on a surface, typically paper, using tools such as pencils, pens, and charcoal. It is a versatile medium that allows artists to express ideas, emotions, and stories through lines, shapes, and shading. Historical Background • Prehistoric Beginnings: The earliest known drawings date back to prehistoric times, with cave drawings found More. Lay the tracing paper over your drawingDrawing is a foundational art form that involves creating images on a surface, typically paper, using tools such as pencils, pens, and charcoal. It is a versatile medium that allows artists to express ideas, emotions, and stories through lines, shapes, and shading. Historical Background • Prehistoric Beginnings: The earliest known drawings date back to prehistoric times, with cave drawings found More, trace the design, and then flip the tracing paper over onto your linoleum block, rubbing the back to transfer the mirrored image onto the block.

Carving the Linoleum Block
With your mirrored design transferred onto the linoleum block, you’re ready to start carving. Here’s how to do it, step by step:
- Secure Your Block: Place your linoleum block on a non-slip surface or use a bench hook to keep it steady. This helps prevent accidents and ensures clean cuts.
- Select Your Tools: Choose the appropriate carving tools for your design. U-gouges are great for clearing large areas, while V-gouges are perfect for detailed lines.
- Outline the Design: Start by carving along the outlines of your design. Hold the tool at a slight angle and apply steady pressure. Always carve away from your body and fingers to avoid injuries.
- Remove Background Areas: Once the outlines are carved, use larger gouges to remove the background areas. Be mindful of the depth and pressure to maintain control over your cuts.
- Refine the Details: Go back with finer tools to add details and clean up any rough edges. Take your time to ensure that the lines are crisp and precise.
Remember, Escher paid great attention to detail, and this step is where your patience will shine through. Keep a brush handy to sweep away linoleum shavings and keep your work area clean.

Inking and Printing
Now that your block is carved, it’s time to bring your design to life with inkInk, a liquid or paste used for writing, drawing, and printing, has played a crucial role in communication and artistic expression throughout history. Made from various pigments and dyes, ink allows for the transfer of text and images onto surfaces such as paper, fabric, and other materials. Types of Ink There are several types of ink, each serving different purposes More and paper. Follow these steps for successful inking and printing:
Choose Your InkInk, a liquid or paste used for writing, drawing, and printing, has played a crucial role in communication and artistic expression throughout history. Made from various pigments and dyes, ink allows for the transfer of text and images onto surfaces such as paper, fabric, and other materials. Types of Ink There are several types of ink, each serving different purposes More: Select a high-quality printing inkInk, a liquid or paste used for writing, drawing, and printing, has played a crucial role in communication and artistic expression throughout history. Made from various pigments and dyes, ink allows for the transfer of text and images onto surfaces such as paper, fabric, and other materials. Types of Ink There are several types of ink, each serving different purposes More suitable for linocut. Oil-based inks offer rich colors and crisp details but can be harder to clean up. Water-based inks are easier to handle but may require more layers.
Prepare the InkInk, a liquid or paste used for writing, drawing, and printing, has played a crucial role in communication and artistic expression throughout history. Made from various pigments and dyes, ink allows for the transfer of text and images onto surfaces such as paper, fabric, and other materials. Types of Ink There are several types of ink, each serving different purposes More: Squeeze a small amount of inkInk, a liquid or paste used for writing, drawing, and printing, has played a crucial role in communication and artistic expression throughout history. Made from various pigments and dyes, ink allows for the transfer of text and images onto surfaces such as paper, fabric, and other materials. Types of Ink There are several types of ink, each serving different purposes More onto a smooth, flat surface like a glass plate. Use a brayer (a small roller) to spread the inkInk, a liquid or paste used for writing, drawing, and printing, has played a crucial role in communication and artistic expression throughout history. Made from various pigments and dyes, ink allows for the transfer of text and images onto surfaces such as paper, fabric, and other materials. Types of Ink There are several types of ink, each serving different purposes More evenly until it makes a thin, tacky layer.

InkInk, a liquid or paste used for writing, drawing, and printing, has played a crucial role in communication and artistic expression throughout history. Made from various pigments and dyes, ink allows for the transfer of text and images onto surfaces such as paper, fabric, and other materials. Types of Ink There are several types of ink, each serving different purposes More the Block: Roll the inked brayer over your linoleum block. Apply the inkInk, a liquid or paste used for writing, drawing, and printing, has played a crucial role in communication and artistic expression throughout history. Made from various pigments and dyes, ink allows for the transfer of text and images onto surfaces such as paper, fabric, and other materials. Types of Ink There are several types of ink, each serving different purposes More evenly, making sure all the raised areas are covered without filling the carved lines.

Prepare Your Paper: Choose a high-quality printmaking paper. Lightweight paper works well for hand-pressing, while heavier paper is better for using a press.
Press the Print: Place the inked block face-up on a flat surface. Carefully lay the paper on top of the block. If you’re using a press, follow the manufacturer’s instructions. For hand-printing, use a baren or the back of a spoon to rub the paper, applying even pressure across the entire block.
Lift the Paper: Slowly peel the paper away from the block to reveal your print. Handle the paper by the edges to avoid smudging the inkInk, a liquid or paste used for writing, drawing, and printing, has played a crucial role in communication and artistic expression throughout history. Made from various pigments and dyes, ink allows for the transfer of text and images onto surfaces such as paper, fabric, and other materials. Types of Ink There are several types of ink, each serving different purposes More.

Tips for Achieving Clean, Detailed Prints
- Consistent Pressure: Apply consistent pressure when inking and pressing to ensure an even print.
- Test Prints: Make a few test prints to check the inkInk, a liquid or paste used for writing, drawing, and printing, has played a crucial role in communication and artistic expression throughout history. Made from various pigments and dyes, ink allows for the transfer of text and images onto surfaces such as paper, fabric, and other materials. Types of Ink There are several types of ink, each serving different purposes More coverage and pressure. Adjust as needed.
- Clean Tools: Keep your tools clean to avoid unwanted marks or smudges on your print.
- Drying Time: Allow your prints to dry completely before handling or framing them.
By following these steps and taking inspiration from Escher’s dedication to detail, you can create beautiful linocut prints that showcase your creativity and skill. Happy printing!
6 Lino Print Examples and Inspiration
M.C. Escher’s prints offer a glimpse into his careful process and creative brilliance. Let’s look at them side by side with contemporary artists who draw inspiration from his techniques, creating stunning modern linocut pieces.
Analyzing Escher’s Works
“Fish and Scales” (1926)
This early linocut by Escher showcases his fascination with symmetry and repetitive patterns. The detailed fish scales highlight the precision achievable with linocut techniques.
“Lizard” (1942)
In “Lizard,” Escher explores the concept of tessellation, where the shapes fit together perfectly without gaps. This work demonstrates his mastery of geometric forms in linocut.

“Day and Night” (1938)
Although not a linocut, this woodcut print features dual landscapes transitioning from day to night. Its perfect symmetry can inspire similar effects in linocut projects.

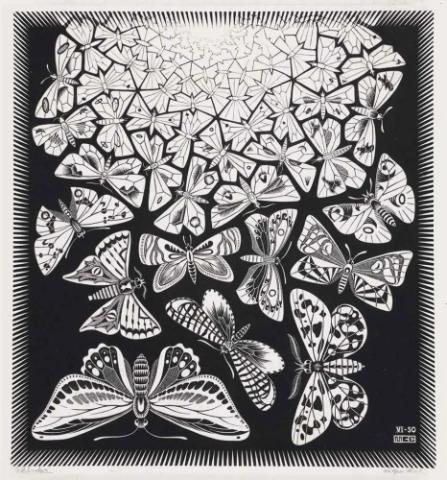
“Butterflies” (1950)
Escher’s “Butterflies” presents an intricate arrangement of butterflies, showcasing his ability to create complex patterns with a simple medium. This work is a testament to the versatility of linocut.
Modern Lino Print Examples
Sarah Young
Sarah Young’s work features detailed and whimsical designs inspired by nature and mythologyMythology in art taps into the rich stories and symbols from ancient cultures. These narratives shape our understanding of history, morality, and human nature, offering a profound connection between the past and the present. From the ancient Greeks to the Norse sagas, mythological themes have deeply influenced artistic expression. Greek Mythology Greek mythology is one of the most popular sources More. Her use of linocut demonstrates the medium’s potential for fine detail and expressive imagery.
Nell Smith
Nell Smith’s linocuts often depict animals and natural scenes with a modern twist. Her prints are known for their bold lines and striking contrasts, showcasing the dynamic possibilities of linocut and screenprint.
Nick Morley (Linocutboy)
Nick Morley, also known as Linocutboy, creates contemporary linocuts that often blend humor with intricate detail. His work pushes the boundaries of traditional linocut techniques.
Andrea Lauren
Andrea Lauren’s linocuts feature playful and vibrant designs, often focusing on flora and fauna. Her use of color and pattern showcases the versatility of linocut in modern art.
These examples from Escher and contemporary artists highlight the many possibilities of linocut printmaking. DrawingDrawing is a foundational art form that involves creating images on a surface, typically paper, using tools such as pencils, pens, and charcoal. It is a versatile medium that allows artists to express ideas, emotions, and stories through lines, shapes, and shading. Historical Background • Prehistoric Beginnings: The earliest known drawings date back to prehistoric times, with cave drawings found More from Escher’s geometric precision or the inventive styles of modern artists, linocut unlocks endless opportunities for creative expression.
7 Troubleshooting and Tips
As an artist, it is inevitable to encounter some challenges. Linocut printmaking is no exception. Here are some common issues you might face and tips to help you refine your technique and improve your prints.
Common Issues and Solutions
- Uneven Inking
- Problem: The inkInk, a liquid or paste used for writing, drawing, and printing, has played a crucial role in communication and artistic expression throughout history. Made from various pigments and dyes, ink allows for the transfer of text and images onto surfaces such as paper, fabric, and other materials. Types of Ink There are several types of ink, each serving different purposes More is not spread evenly on the block, leading to blotchy prints.
- Solution: Use a brayer to roll out a thin, even layer of inkInk, a liquid or paste used for writing, drawing, and printing, has played a crucial role in communication and artistic expression throughout history. Made from various pigments and dyes, ink allows for the transfer of text and images onto surfaces such as paper, fabric, and other materials. Types of Ink There are several types of ink, each serving different purposes More. Make sure the inkInk, a liquid or paste used for writing, drawing, and printing, has played a crucial role in communication and artistic expression throughout history. Made from various pigments and dyes, ink allows for the transfer of text and images onto surfaces such as paper, fabric, and other materials. Types of Ink There are several types of ink, each serving different purposes More is tacky and not too thick.
- Smudged Prints
- Problem: The print appears smudged or blurry.
- Solution: Ensure the paper is pressed down evenly and avoid moving it once placed on the inked block. Use a baren or spoon to apply even pressure.
- Carving Mistakes
- Problem: Unintended cuts or gouges in the linoleum block.
- Solution: Plan your design carefully and carve slowly. If mistakes occur, incorporate them into the design or use a filler to repair small gouges.
- Paper Sticking to Block
- Problem: The paper sticks to the block when lifting, causing tears or smudges.
- Solution: Allow the inkInk, a liquid or paste used for writing, drawing, and printing, has played a crucial role in communication and artistic expression throughout history. Made from various pigments and dyes, ink allows for the transfer of text and images onto surfaces such as paper, fabric, and other materials. Types of Ink There are several types of ink, each serving different purposes More to set for a few moments before pressing the paper, and use a lightweight paper that can be easily removed.

Enhancing Your Prints
- Consistent Pressure
- Apply consistent pressure when inking and pressing to ensure an even print.
- Use a printing press or a baren for best results, applying steady and even pressure.
- Quality Materials
- Use high-quality linoleum, inks, and paper for better print outcomes.
- Ensure your tools are sharp and well-maintained to achieve clean cuts.
- Test Prints
- Make a few test prints to check the inkInk, a liquid or paste used for writing, drawing, and printing, has played a crucial role in communication and artistic expression throughout history. Made from various pigments and dyes, ink allows for the transfer of text and images onto surfaces such as paper, fabric, and other materials. Types of Ink There are several types of ink, each serving different purposes More coverage and pressure. Adjust as needed.
- Test prints help you identify areas that need more inkInk, a liquid or paste used for writing, drawing, and printing, has played a crucial role in communication and artistic expression throughout history. Made from various pigments and dyes, ink allows for the transfer of text and images onto surfaces such as paper, fabric, and other materials. Types of Ink There are several types of ink, each serving different purposes More or pressure adjustments.
- LayeringLayering is a fundamental technique in art that involves building up multiple layers of material to create depth, texture, and complexity in a composition. This approach is used in various art forms, including painting, drawing, digital art, and mixed media. Layering allows artists to add richness and dimension to their work, making it more dynamic and engaging. Defining Layering Layering More Colors
- For multi-colored prints, use a registration system to align each layer accurately.
- Print lighter colors first and build up to darker colors to maintain clarity and contrast.
- Cleaning Tools
- Keep your tools and workspace clean to avoid unwanted marks or smudges on your prints.
- Clean your brayer and block thoroughly after each use to prevent inkInk, a liquid or paste used for writing, drawing, and printing, has played a crucial role in communication and artistic expression throughout history. Made from various pigments and dyes, ink allows for the transfer of text and images onto surfaces such as paper, fabric, and other materials. Types of Ink There are several types of ink, each serving different purposes More build-up.
By addressing common issues and refining your technique, you can improve the quality and consistency of your lino prints. These tips will help you achieve the clean, detailed results you’re aiming for.

From Concept to Creation: Celebrating Your Progress
You’ve taken a deep dive into the world of linocut printmaking. Starting with a clear design, you’ve transferred your vision onto linoleum, carved out your block, and mastered the inking and printing process.
Each step requires patience and focus, much like M.C. Escher in his works.
Along the way, you probably faced a few bumps in the road—from uneven inkInk, a liquid or paste used for writing, drawing, and printing, has played a crucial role in communication and artistic expression throughout history. Made from various pigments and dyes, ink allows for the transfer of text and images onto surfaces such as paper, fabric, and other materials. Types of Ink There are several types of ink, each serving different purposes More coverage to smudges and carving mishaps. But each challenge you overcome adds to your skills and understanding of this art form. Your experiences will make you a better printmaker and deepen your appreciation for the craft.
Looking at your finished prints, take a moment to appreciate how far you’ve come. Each print is a testament to your dedication and growth. Linocut printing offers endless possibilities, and with each project, you refine your technique and push your creative boundaries.
Keep experimenting and learning. There are many exciting projects ahead. Enjoy every step and continue to celebrate your lino progress.

Quick Facts and FAQ
Quick Facts
- Lino Printing Basics: Lino printing is a form of printmaking where a design is carved into a linoleum block and then inked and pressed onto paper. It’s popular for its simplicity and accessibility.
- Tools Needed: A basic lino printing kit usually includes linoleum blocks, carving tools, inkInk, a liquid or paste used for writing, drawing, and printing, has played a crucial role in communication and artistic expression throughout history. Made from various pigments and dyes, ink allows for the transfer of text and images onto surfaces such as paper, fabric, and other materials. Types of Ink There are several types of ink, each serving different purposes More, and a brayer. Additional tools like a bench hook and baren can improve your results.
- Materials: The best linoleum for printmaking is soft and easy to carve, making it suitable for detailed designs. Look for high-quality, durable materials to achieve the best results.
- Popular Projects: Artists use lino printing for creating cards, posters, fabric designs, and art prints. It allows for creativity and versatility in artistic expression.
FAQ
Q: Is lino printing easy?
A: Yes, lino printing is relatively easy to learn and great for beginners. The basic process involves carving a design into linoleum, inking it, and pressing it onto paper. With practice, you can create detailed and beautiful prints. Many artists find it a rewarding and enjoyable art form.
Q: Where can I buy lino for printing?
A: You can buy lino for printing at art supply stores, both online and in physical locations. Stores like Blick Art Materials and Michaels often carry a variety of lino printing supplies. For convenience, many people choose to purchase from online retailers like Amazon. Make sure to choose the best lino for printing to ensure quality results.
Q: What paper should I use for lino printing?
A: The best paper for lino printing is usually smooth and strong to handle the pressure of printing. Printmaking paper like Japanese Washi or heavier watercolor paper works well. It should absorb inkInk, a liquid or paste used for writing, drawing, and printing, has played a crucial role in communication and artistic expression throughout history. Made from various pigments and dyes, ink allows for the transfer of text and images onto surfaces such as paper, fabric, and other materials. Types of Ink There are several types of ink, each serving different purposes More well without warping or tearing. Test a few types to see which gives you the best results.
Q: What are the best linoleum cutting tools?
A: The best linoleum cutting tools include a variety of gouges and knives designed for detailed work. Brands like Speedball and Essdee offer high-quality carving tools. It’s important to keep your tools sharp for clean cuts. Investing in a good set of carving tools can greatly enhance your lino printing experience.
Q: What are some good lino print examples?
A: Examples of lino prints can range from simple one-color designs to complex multi-color images. Artists like M.C. Escher and Pablo PicassoPablo Picasso (1881–1973), was a Spanish painter, sculptor, graphic artist, and resident in France from 1904. He was a dominant figure in avant-garde movements in the first half of the 20th century due to his technical versatility and prolific inventiveness. picasso-self-portrait Picasso’s progression in his early work is largely categorized by predominant colour schemes: His Blue Period (1901-1904) features motifs More have created famous lino prints. Look at contemporary lino print artists for inspiration. Viewing a variety of lino print examples can help you understand the possibilities of this medium.
Q: How do I print lino effectively?
A: To print lino effectively, ensure your linoleum block is evenly inked and your paper is properly aligned. Use a printing press or hand tools like a baren or spoon to apply even pressure. Consistent pressure is key to transferring the inkInk, a liquid or paste used for writing, drawing, and printing, has played a crucial role in communication and artistic expression throughout history. Made from various pigments and dyes, ink allows for the transfer of text and images onto surfaces such as paper, fabric, and other materials. Types of Ink There are several types of ink, each serving different purposes More smoothly. Practicing the inking and pressing process will improve your results.
Q: What are the best lino printing inks?
A: The best lino printing inks are often water-based or oil-based, depending on your preference. Speedball and Akua are popular brands that offer high-quality inks. Water-based inks are easier to clean up, while oil-based inks provide richer colors. Choose the best lino print inkInk, a liquid or paste used for writing, drawing, and printing, has played a crucial role in communication and artistic expression throughout history. Made from various pigments and dyes, ink allows for the transfer of text and images onto surfaces such as paper, fabric, and other materials. Types of Ink There are several types of ink, each serving different purposes More based on your project needs.
Q: Are there any recommended lino printing books?
A: Yes, several books offer excellent guidance on lino printing techniques and inspiration. “The Encyclopedia of Printmaking Techniques” and “Block Print Magic” are great resources. These books cover everything from basic techniques to advanced projects. Reading about different approaches can expand your skills and creativity.
Q: What is the best linoleum for block printing?
A: The best linoleum for block printing is soft and easy to carve, such as Speedball Speedy-Carve or Essdee SoftCut. These types of linoleum are ideal for beginners and experienced artists alike. They allow for precise and detailed carving. High-quality linoleum ensures better prints and a more enjoyable carving experience.
Q: Who are some notable lino printing artists?
A: Notable lino printing artists include M.C. Escher, known for his intricate designs, and Pablo PicassoPablo Picasso (1881–1973), was a Spanish painter, sculptor, graphic artist, and resident in France from 1904. He was a dominant figure in avant-garde movements in the first half of the 20th century due to his technical versatility and prolific inventiveness. picasso-self-portrait Picasso’s progression in his early work is largely categorized by predominant colour schemes: His Blue Period (1901-1904) features motifs More, who explored this medium in his later years. Contemporary artists like Nick Morley (Linocutboy) and Sherrie York are also recognized for their lino prints. Exploring works by these artists can provide inspiration and insight into the art of lino printing.
You might also enjoy reading the following posts by Pigment Pool:
M.C. Escher Art Work: 19 Fascinating Insights into His Life and Creations
Pop Art Ideas: Easy Painting Techniques to Capture the Warhol Essence
Ultimate Guide to the Best Colored Pencils – Must-Know Facts for Hobbyists and Artists
The Best Acrylic Paint Set for Artists and Hobbyists In 2024
Famous Abstract Paintings: Joan Miró Art Works You Must Know
Full Disclosure: Clicking on product links could mean a tiny commission for me, at no extra cost to you.